How To Draw Feathers: Step-by-Step Guide And Tutorials
Can the graceful simplicity of a single feather truly unlock the secrets of artistic expression? The answer, surprisingly, is yes. Drawing a feather, a seemingly straightforward exercise, is a gateway to understanding form, light, and the very essence of how to render complex textures.
The quest to capture the intricacies of a feather is a journey into the heart of observation. From the delicate barbs that catch the light to the central shaft that provides its structural integrity, a feather presents a microcosm of artistic challenges. You might start by sketching a large circle and a small circle to visualize how a turkey is drawn, and connect them. Later, adding a fan shape for the tail feathers is a great idea! The simple exercise of replicating a feather allows one to explore shapes and patterns without having to deal with the unpredictable movements of a live bird. Studying a feather, whether from a photograph or a found specimen, offers a wealth of information. It gives you the details you need to complete the drawing. The beauty of such a study lies in its accessibility; you can take as much time as you need, methodically dissecting the subject until you achieve a true rendering. This approach is particularly beneficial for beginners, allowing them to build a foundation of skills before tackling more complex subjects. Remember, a drawing, especially a feather drawing, doesn't necessarily look like anything great in the beginning stages. This is where patience and persistence come in. Try a study drawing, where you methodically work through the shapes and details.
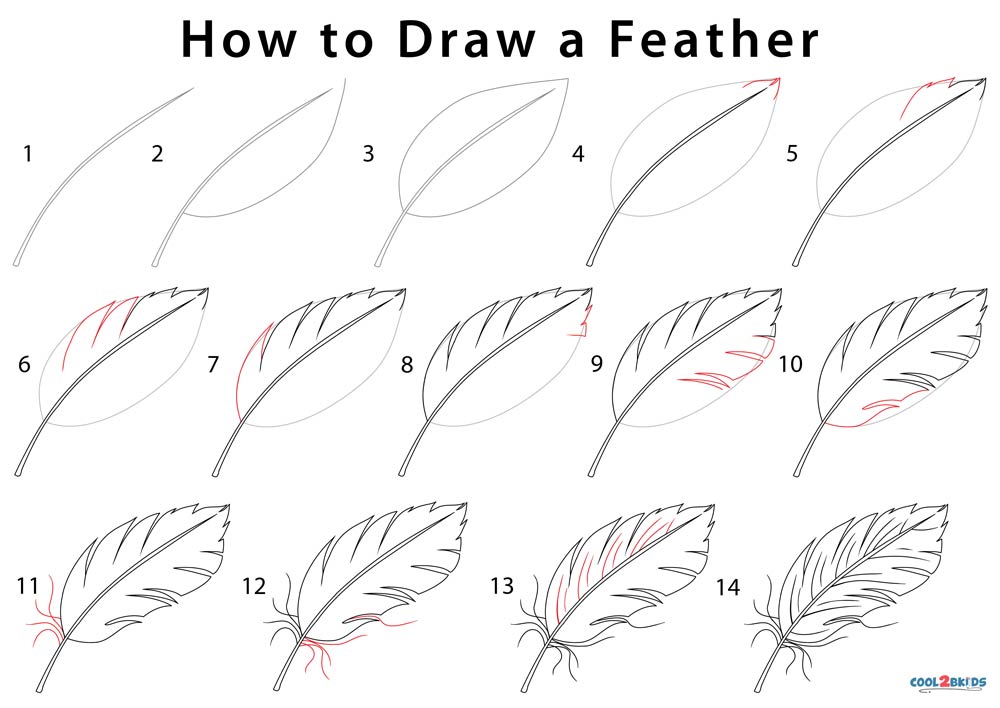
To truly understand the process of drawing a feather, let's delve into the fundamentals and break down the steps. Remember that drawing feathers is not just about replicating what you see; its about understanding its effect and the interplay of light and shadow. This is a skill that transcends the specific subject matter, honing your ability to observe, analyze, and translate the world onto the page.
- Saying Hi In Japanese Your Guide To Greetings Culture
- Lauren Graham Peter Krause Relationship Timeline Breakup Details
| Aspect | Details |
|---|---|
| Drawing Technique | Focus on light lines for initial outlines, darkening details later. |
| Material | Start with pencil unless drawing digitally. |
| Detailing | Add the feather details once you've added the outlines. |
| Reference | It's suggested to create your drawing by looking at a feather. You can use a photo or a real feather. |
| Feather Type | For this tutorial, we will draw a great horned owls feathers. We will be focusing on the central tail and wing feather. |
Imagine the challenge of capturing a bird's intricate plumage. Every artist wonders how they get the look of feathers? Well, it is not hard, but it is time consuming. Learning to draw feathers is a cornerstone of bird art. The principles of how to draw a feather are the same regardless of the species. It's an essential step for anyone who wants to master drawing animals and their textures. The beauty of this method is its universal application. Once you understand the structure of a feather and the steps for sketching one, youll be able to draw any bird you like. Want to learn how to draw a realistic feather step by step? Drawing a feather can be a great place to start for beginners. It's good to start from the top. The key is to build a foundation that facilitates artistic growth. Learning at your own pace in the comfort of your home. You can follow along with me if you want, or just read through the first time then come back and follow the steps. This skill set enables you to approach more complicated subjects, from sketching a simple turkey to detailed illustrations of avian anatomy.
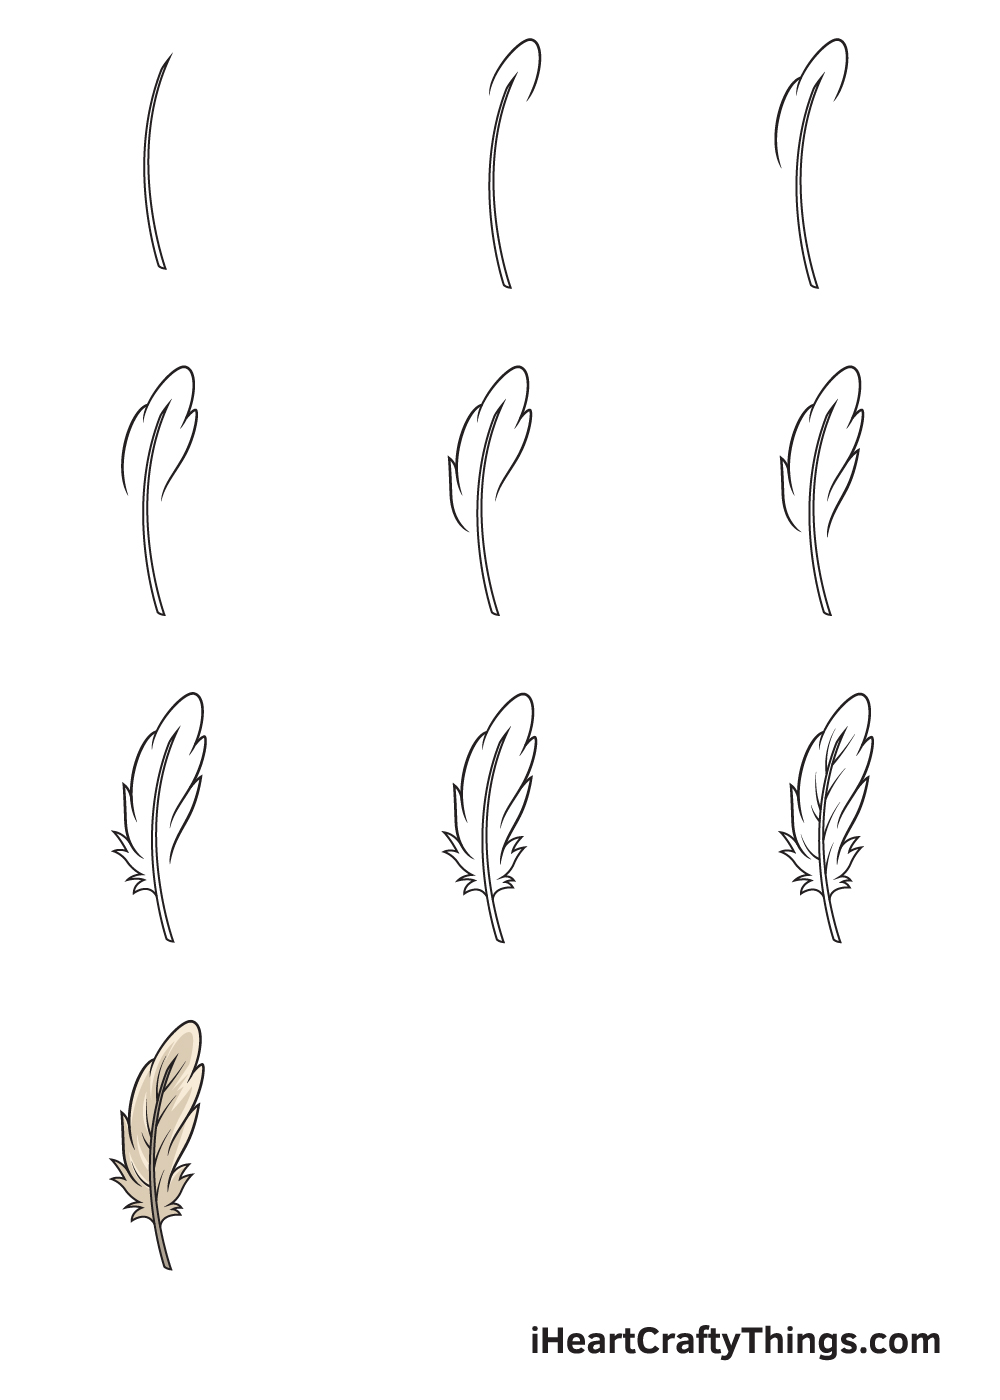
Understanding the structure of a feather is key. Each feather, regardless of its size or type, consists of a central shaft, known as the rachis, from which barbs extend. These barbs interlock to create the vane, the flat, streamlined surface that enables flight. The barbules, tiny hooks on the barbs, further enhance the feather's structure. Notice that the different barbs go in different directions, though! It's these elements that create the texture and the unique aesthetic of a feather. Note the tips are still soft and fluffy. The process of drawing a feather, therefore, involves more than simply outlining its shape; it requires careful observation and rendering of its components.
To begin, consider the various angles you might encounter when drawing a feather. When you see the feathers from the front, you will notice that the pattern is not as easily visible. And, the feathers will look quite a bit like fluffy fur. It's essential to work lightly and first draw an accurate feather outline before working on the details. Start drawing the closest to the body on the upperwing, and the farthest from it on the underwing. The artist has chosen popular animal pictures and will show you how to draw. One useful piece of advice is to start from the top of the wing. This is a good way to start the process. Drawing what you see in a photo will help you explore shapes and patterns without having to deal with a live bird's movement (or disappearance). In the initial steps of the drawing, make light lines and gradually build up the details. Its not about drawing each individual fur strand, you draw big lumps of it. And, when you draw the row of feathers, keep in mind which side youre drawing.
- Explore Thirty One Purses Handbags Find Your Perfect Bag
- Fox Murray Funeral Home Recent Obituaries Service Details Find Info
When it comes to free motion feathers, there's a unique approach. When giving a workshop free motion feathers, students are taught to work in a specific order. It starts with drawing feathers until the process becomes second nature. The next step involves perforating your drawing(s) with the empty needle of your machine by tracing the lines. Remember to remove any thread from the top and bobbin. Then, turn on the machine and follow the lines as closely as possible. The goal is to create a gradient effect where the feathers gradually become smaller as you move down the curve of your drawing of wings. Finishing your drawing of wings to finish your wings sketch, you are now going to draw the large final feathers on each wing. To demystify bird drawing, were going to show you both elements.
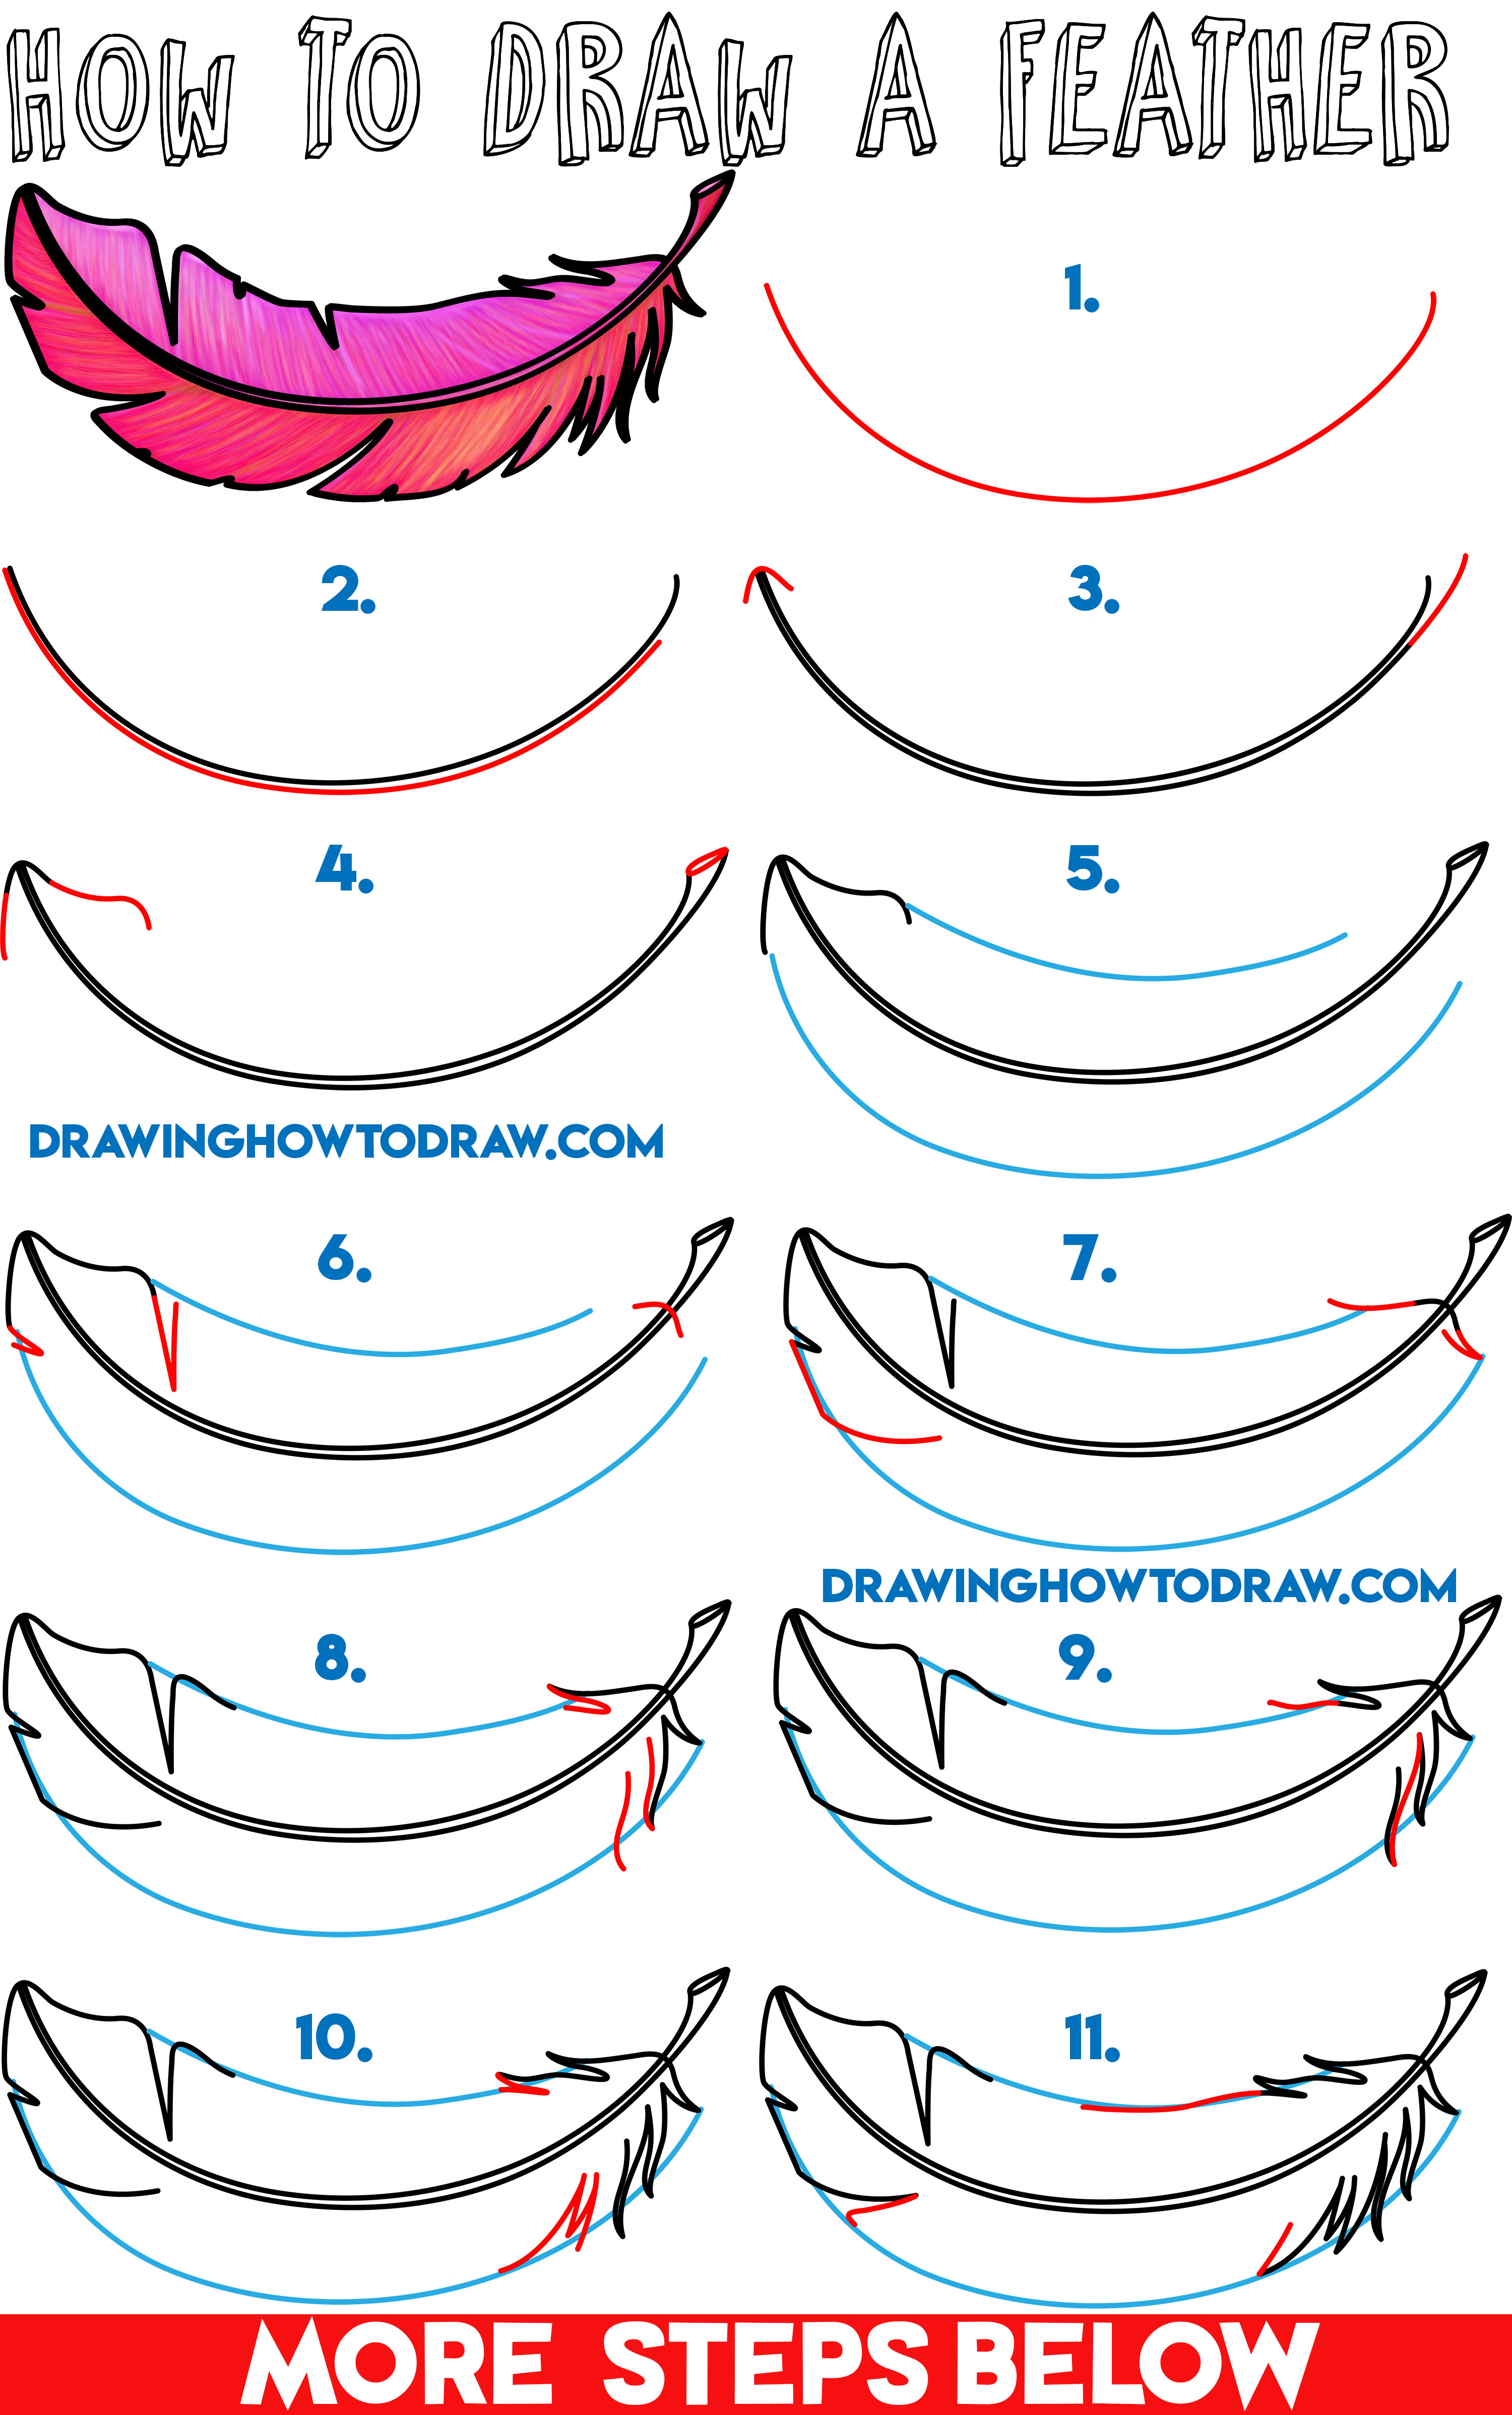
| Step | Action |
|---|---|
| 1 | Drawing the Central Part: Let us start by drawing the central part of the feather, the |
| 2 | Outline: Start with a light outline of the feather's shape. |
| 3 | Rachis: Draw the central shaft (rachis) of the feather. |
| 4 | Barbs: Add the barbs extending from the rachis. |
| 5 | Details: Refine the details, add texture, and vary the barb directions. |
| 6 | Light and Shadow: Begin to add shading. |
| 7 | Refinement: Darken the lines and make any necessary adjustments. |
| 8 | Add the Details: Add feather details. |
Drawing a feather step by step is an excellent tutorial that will guide you through the process of creating a realistic feather drawing. Drawing a feather can be a great place to start for beginners. You'll learn at your own pace in the comfort of your home. Remember, you can also study artists, who can teach you how to tackle specific drawing problems. You said the best way to study is from life, but actually, studying artists is extremely useful too. Look how they dealt with a specific problem, no need to
Drawing is a skill that can be learned and improved with practice. The key is to break down complex subjects into manageable steps. The process starts by drawing a realistic feather. When drawing the wing, you just need to draw the actual feathers on this base. Drawing feathers isn't about drawing the fur texture everywhere; it's about drawing its effect. The wing is fully constructed! Remember, animal mastery is what you need to successfully learn to draw your favorite animals. You can darken them once youve added all of the feathers details. If you follow along and practise with me, you should be able to draw any feather as the principles are the same. Your feather drawing is complete! Now that you can draw a feather, perhaps you can draw a bird with beautiful, detailed feathers next? We have a lot of drawing tutorials of different kinds of birds.
The beauty of the feather lies in its potential to inspire creativity. From the intricate details to the overall form, every element presents an opportunity for artistic exploration. Every wonder how artists get the look of feathers? Well, the process of drawing a feather also provides a foundation for future projects. And, perhaps you can draw a bird with beautiful, detailed feathers next? Every one can draw a turkey. If you want to learn how to draw a turkey, heres the idea: Break down the turkey into basic shapes. Anyone can draw a turkey, even very young children! Start by sketching a large circle (body) and a small circle (head) and connect them. Add a fan shape for the tail feathers. Add feet, an eye, a beak, a wattle, and some feathers and you are all set. Remember, it is not hard, but it is time consuming. You can follow along with me if you want, or just read through the first time then come back and follow the steps. Every wonder how artists get the look of feathers? Well i'm going to show you how to do it. It's not hard, but it is time consuming. So get yourself nice and comfy and lets get started. If you follow along and practise with me, you should be able to draw any feather as the principles are the same. You will see more of the feathers here, but the tips are still soft and fluffy. Note that the different barbs go in different directions, though! We have a lot of drawing tutorials of different kinds of birds.
Detail Author:
- Name : Prof. Bridie Glover PhD
- Username : kuhlman.jaleel
- Email : dallin.king@yahoo.com
- Birthdate : 1981-07-24
- Address : 7751 Brando Common Terryville, MD 96114
- Phone : (828) 234-2619
- Company : Schuppe, Gaylord and Rosenbaum
- Job : Model Maker
- Bio : Quisquam consequatur ut eos facilis. Sequi ullam occaecati asperiores unde at eos. Exercitationem officia expedita vero amet architecto voluptatem molestiae architecto.
Socials
facebook:
- url : https://facebook.com/ilene.lakin
- username : ilene.lakin
- bio : Dolore non praesentium praesentium neque. Eos quas quae dolorem.
- followers : 1118
- following : 29
tiktok:
- url : https://tiktok.com/@ilenelakin
- username : ilenelakin
- bio : Et ut labore odit quia corporis voluptas. Provident quia iste nobis quia.
- followers : 2966
- following : 433
linkedin:
- url : https://linkedin.com/in/ilene_lakin
- username : ilene_lakin
- bio : Fugiat nemo voluptas ut soluta repudiandae.
- followers : 5908
- following : 2626
